Unveiling the Ultimate Chocolate Cheesecake Recipe for a Decadent Treat
Few desserts capture the heart quite like a chocolate cheesecake recipe. It's a symphony of rich, creamy texture and deep, intense chocolate flavor that promises to impress at any gathering or simply provide an exquisite indulgence for yourself. If you're searching for that perfect balance of sweetness and bitter notes, all enveloped in a velvety smooth cheesecake, you've come to the right place. This guide will walk you through crafting a truly exceptional chocolate cheesecake, ensuring every bite is a memorable experience.
Our featured chocolate cheesecake recipe is designed for maximum chocolaty impact, from its crunchy base to its luscious filling and optional, but highly recommended, ganache topping. While the process may seem intricate, careful attention to detail and a few expert tips will guarantee a stunning result. Get ready to dive into the world of truly decadent baking!
The Foundation: Crafting the Perfect Chocolate Graham Cracker Crust
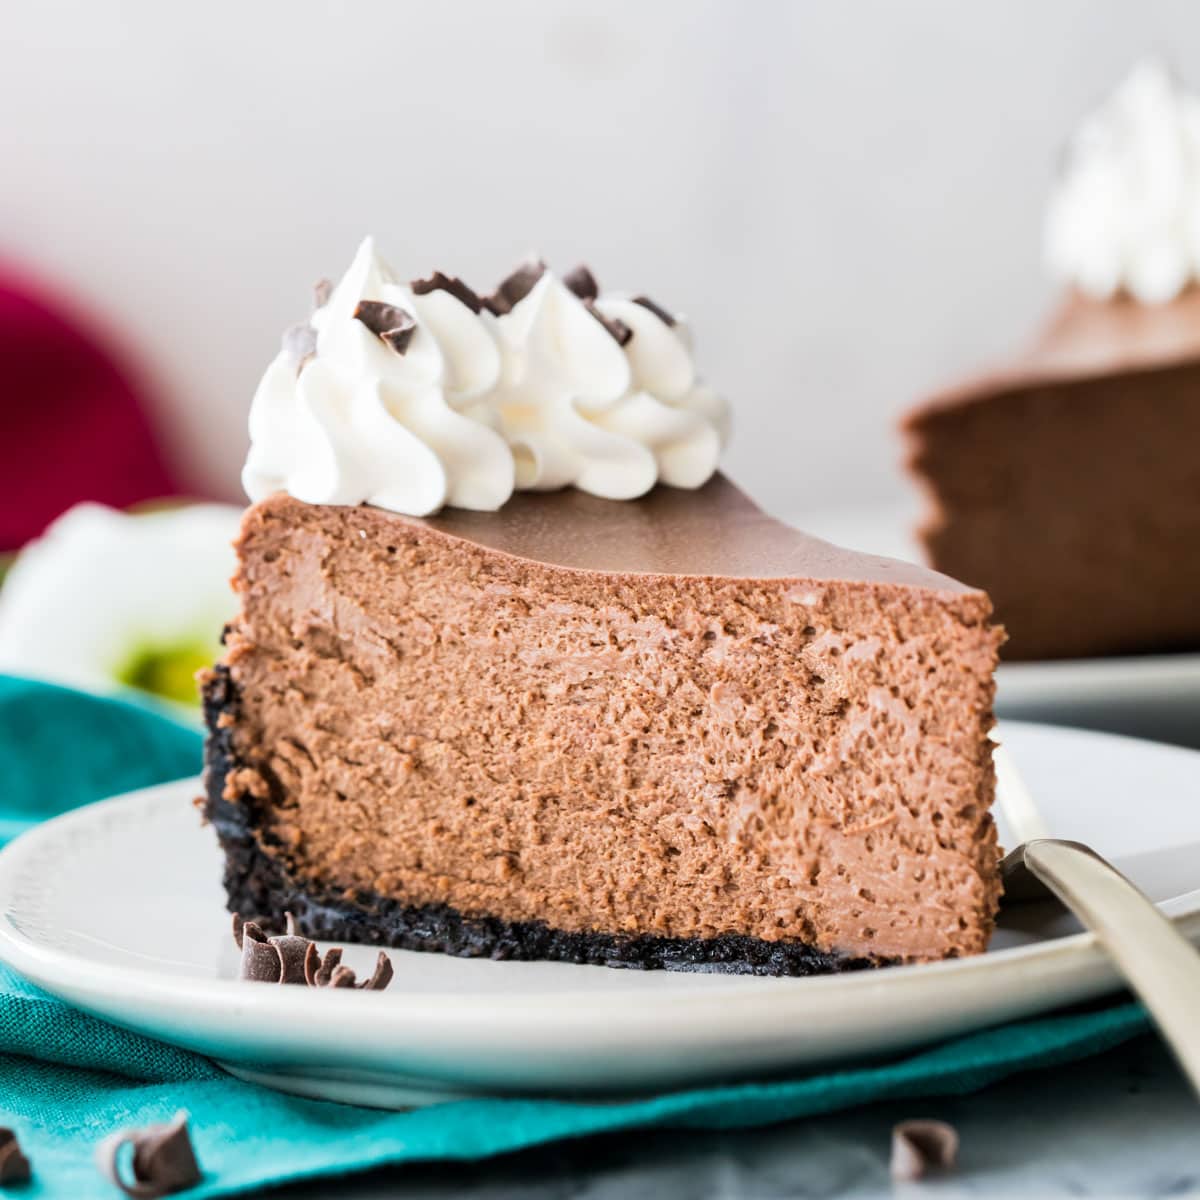
Every great cheesecake begins with an outstanding crust, and for a chocolate cheesecake, a chocolate graham cracker crust is non-negotiable for amplifying that rich flavor profile. This isn't just about holding the filling; it's an integral part of the overall sensory experience.
Ingredients for Your Decadent Crust:
- 1 ¼ cups chocolate or regular graham cracker crumbs: Approximately 9-10 full-size sheets, finely ground. While chocolate graham crackers are ideal for an intensified cocoa hit, regular ones work beautifully too, allowing the filling to shine even more.
- ¼ cup sugar: Just enough to add a touch of sweetness and help bind the crust.
- ⅓ cup unsalted butter, melted: The key to a perfectly moist and pressable crust. Using unsalted butter gives you control over the overall saltiness.
Assembling the Crust:
- Prepare Your Pan: Begin by positioning your oven rack to the middle, with another shelf one rung down. This lower shelf will later hold a pan of boiling water, essential for creating a humid baking environment. Preheat your oven to a steady 325°F (160°C). If you're using a dark, nonstick pan, there's no need to reduce the oven temperature. Generously grease the bottom and sides of a 9- or 10-inch springform pan or a 10 x 2-inch cake pan with vegetable oil spray. A 9 x 2-inch cake pan simply isn't deep enough for this recipe. For extra insurance against sticking, you can cut a parchment paper disk to fit the bottom of the pan and grease that as well.
- Combine Ingredients: In your prepared pan, combine the finely ground graham cracker crumbs and sugar. Mix them thoroughly. Drizzle the melted butter over the crumb mixture, stirring until every crumb is evenly moistened.
- Press and Chill: Use the bottom of a glass or your fingers to firmly press the moistened crumbs into an even layer across the bottom of the pan. The tighter you press, the more cohesive and sturdy your crust will be. Once pressed, set the crust aside in the refrigerator to chill while you prepare the filling. This helps it set and prevents it from crumbling when slicing.
Decadent Depths: Mastering the Chocolate Cheesecake Filling
The heart of any chocolate cheesecake recipe lies in its filling – a delicate balance of creamy texture and profound chocolate flavor. This section requires precision and a gentle touch to achieve that signature smooth, crack-free finish.
Key Ingredients for a Velvety Filling:
- ¼ cup Dutch-process or Natural cocoa powder, sifted: Sifting is crucial to prevent lumps. Dutch-process cocoa offers a darker color and milder, less acidic chocolate flavor, enhancing the richness. Natural cocoa will yield a slightly lighter color and a more robust chocolate note.
- 2 tablespoons hot water: Used to bloom the cocoa powder, intensifying its flavor.
- 9 ounces semi-sweet or bittersweet chocolate or chocolate chips, melted and cooled: Quality chocolate makes a significant difference here. Semi-sweet provides a classic balance, while bittersweet will lend a deeper, more sophisticated flavor. Ensure it's melted smoothly and then cooled completely to avoid scrambling the cream cheese.
- 1 ¼ cups sugar: The perfect amount for sweetness without overpowering the chocolate.
- 2 tablespoons cornstarch: A secret weapon for cheesecake stability, helping to prevent cracks and ensuring a smooth set.
- 32 ounces (four 8-ounce packages) cream cheese; preferably Philadelphia Brand: Room temperature cream cheese is paramount! This ensures a smooth, lump-free batter. Philadelphia is often recommended for its consistent quality and creaminess.
- 1 tablespoon vanilla extract: A classic enhancer that brightens and complements the chocolate.
- 2 teaspoons instant espresso powder, optional: While optional, this ingredient is highly recommended. It doesn't make the cheesecake taste like coffee but rather deepens and amplifies the chocolate flavor significantly.
- ¼ cup heavy whipping cream: Adds an extra layer of richness and contributes to the cheesecake's luxurious texture.
- 4 large eggs: These bind the filling together. Ensure they are at room temperature to incorporate smoothly.
The Art of Mixing the Filling (Crucial Tips for Success):
One of the most common pitfalls in cheesecake baking is overmixing, which incorporates too much air, leading to a puffy cheesecake that inevitably cracks and falls. A stand mixer is highly recommended for ease and consistency, allowing you to maintain a low speed.
- Combine Sugar and Cornstarch: In a medium-sized bowl, whisk together the sugar and cornstarch until well combined.
- Cream Cheese Base: Place one 8-ounce package of room-temperature cream cheese and ½ cup of the sugar/cornstarch mixture into the bowl of your stand mixer. Beat with the paddle attachment on low speed until creamy, about 1 minute. The key is low and slow.
- Gradual Addition of Cream Cheese: Beat in the remaining 3 packages of cream cheese, one at a time, still on low speed. This gradual addition ensures smooth incorporation.
- Flavor Enhancers: Beat in the vanilla extract, then the espresso powder (if using). After each addition, stop the mixer frequently and use a rubber spatula to scrape down the sides of the bowl and the paddle attachment. Pay special attention to the bottom of the bowl, where unmixed ingredients can hide.
- Remaining Sugar Mixture & Heavy Cream: With the mixer still on low, gradually beat in the remaining ¾ cup of the sugar/cornstarch mixture. Once incorporated, slowly drizzle in the heavy cream along the side of the bowl. Continue to beat on low until just combined.
- Melted Chocolate: Gently fold in the cooled, melted chocolate until no streaks remain.
- Eggs – The Final Touch: This is where most overmixing happens! Add the eggs one at a time, beating on the absolute lowest speed possible, just until each egg is incorporated. Scrape the bowl once more to ensure everything is evenly mixed. Stop mixing as soon as the last egg is combined. Any further mixing will incorporate unnecessary air.
Baking to Perfection: Achieving That Silky Smooth Finish
Baking a cheesecake correctly is as important as preparing the ingredients. The water bath technique detailed here is your best friend for a perfectly cooked, crack-free cheesecake.
- Water Bath Setup: Remember that 9 x 13-inch pan you placed on the lower rack? Fill it with boiling water. This creates a steamy environment in your oven, which is critical for even baking and prevents the cheesecake from drying out and cracking.
- Pour and Bake: Pour your meticulously prepared cheesecake filling into the chilled crust. Gently tap the pan on the counter a few times to release any large air bubbles. Carefully transfer the springform pan to the middle oven rack, directly above your water bath.
- Bake Time: Bake for approximately 60-75 minutes, or until the edges are set and slightly puffed, but the center 2-3 inches still jiggles slightly when gently shaken. It will continue to cook as it cools.
- Cooling Process (Crucial!): Once baked, turn off the oven but leave the cheesecake inside with the oven door propped open slightly for about an hour. This slow, gradual cooling prevents thermal shock, a major cause of cracking. After an hour, remove the cheesecake from the oven and let it cool completely on a wire rack at room temperature.
- Refrigerate: Once fully cooled, cover the cheesecake loosely with plastic wrap and refrigerate for at least 6-8 hours, or preferably overnight. This chilling period is essential for the cheesecake to firm up and for the flavors to fully develop.
The Grand Finale: An Irresistible Chocolate Topping (Optional but Recommended)
While delicious on its own, an optional chocolate ganache topping takes this chocolate cheesecake recipe to an unparalleled level of luxury.
Ingredients for Your Silky Topping:
- ¾ cup heavy whipping cream
- 6 ounces (squares) semi-sweet or bittersweet chocolate
- 1 tablespoon sugar
- 1 teaspoon vanilla extract
Crafting the Ganache:
- In a small saucepan, heat the heavy whipping cream and sugar over medium heat until it just begins to simmer around the edges. Do not boil.
- Remove from heat and immediately add the chopped chocolate (or chocolate chips). Let it sit undisturbed for 5 minutes to allow the chocolate to melt.
- Whisk gently from the center outwards until the mixture is completely smooth and glossy. Stir in the vanilla extract.
- Let the ganache cool slightly until it thickens to a pourable consistency, but not so thick that it's difficult to spread. Pour over the chilled cheesecake and spread evenly. Return the cheesecake to the refrigerator for at least 30 minutes for the topping to set.
Conclusion: Savoring Your Masterpiece
Creating this rich and creamy chocolate cheesecake is a labor of love, but one that is immensely rewarding. By following these detailed steps and paying close attention to the small but critical nuances of baking, you'll achieve a dessert that's not just delicious but truly spectacular. The deep chocolate flavor, the velvety texture, and the sheer elegance of this homemade treat make it a showstopper. Enjoy every exquisite slice of your perfectly baked chocolate cheesecake!
